Building a one-product eCommerce store taught me also a couple of valuable experiences with forms I would like to share with you. During the building process, I needed to use a small form within the product variant section and also 2 other forms: one for choosing the shipping and payment method and one for personal info, consents, notes, possible shipping address or company address. In this article I would like to cover the basic about creating such forms using HTML, CSS, JavaScript. Let’s dive into it.
What is a form in HTML?
I would describe form as a set of html inputs placed on website that serve particular role in getting the information from user that is used further for different purposes.
…set of html inputs…What exactly do I mean by that? Imagine coming to the website (e-shop) where you are buying some products. In the product detail there is a possibility to choose the size and the color. We can call this as a small form where we express our buying preferences. Further in the ordering process there is a bigger form where we need to fill in our name, phone number, address and many other details and preferences so our order can be fulfilled in the right way.
The way how we enter the information can differ. Once, we write information in the field, once we choose only one option, once we choose more option, once we need to choose color etc. Therefore, we need more types of inputs that programmers or coders could use so they can prepare the forms for us in the user friendly way.
<input> is usually the most often part of <form>. <input> is just one of the <form> elements tags that could be used. For more info about possible <form> elements you can go to this website. Let’s talk more about <input> tag now. For the <input> tag we do not need to use the close tag, but for the <form> tag we need one </form>. As I mentioned earlier sometimes we need an <input> where the user will check more options at once, sometimes he will choose only one option or a color, date etc. Therefore, we can display <input> element in many different ways. The way how we do it is that we define type attribute. This will determine the way how the <input> is displayed. You can have a look on the list of all possible types here.
Which types of inputs (or form elements) do I use in my simple eCommerce project?
For this portfolio eCommerce project I use 4 form elements: <input>, <label>, <select> and <button>.
When you visit a product page you can select from 3 different lists in order to choose if you would like to include bottle and glasses in your set. Then you can also choose pattern of your whisky set. If you choose that bottle will be part of your set then there will be another list displayed, where you can select whether you want initials on bottle or not. If yes then you can enter 2 capital letters maximum. After clicking on Add to cart you add this product option to the cart.
For this form I used the following <form> elements: for bottle, glasses, pattern and initials I used <select> tag and if you want initials on the bottle, for entering which 2 letters should the producer put on the bottle I used <input type=”text” maxlength=”2″>. Maxlength attribute ensures that there are maximum 2 letters entered.
I need to mention that in the code itself I have not really created the <form> in this step. I used <div> and <section> tags. The reason why I choose not to put the <form> tag in here is that in this step I do not need to submit the data to the server. I solve adding to cart differently.

<select id="whiskyglasses" name="whiskyglasses">
                                       <option value="" disabled selected hidden>Choose</option>
                                     <option value="without glasses">No glasses</option>
                                    <option value="2pcs">2pcs</option>
                                    <option value="6pcs">6pcs</option>
                                </select>
On the left column, you can see one of the <select> tags. <select> tag is a kind of drop-down list where the user can choose from different options. Within the <select> tags there are a couple of options which the user can select from.
You can also see there the option which has 3 attributes disabled, selected, and hidden. This ensures that I can display the call to action Choose… and do not have it as a proper option in the list.
The second most important forms in this project are…
In this case we are talking about the forms in ordering process that are following the cart page. .
There are two pages with forms within the ordering process. The first one where we need to choose the shipping and payment methods. I use here <input type=”radio”> and I still do not use the <form>. The second form is for filling in the name, surname, phone number, invoice address, whether the customer would like to shop for a company or not, shipping address (if it is different from the invoice one), notes and also consents for terms and conditions and privacy policy.
The types of the input that I use the most within this Your information are following:
- input type: text; it is a single-line text field where the user can enter text with the default width of 20 characters
- input type: tel; when we need to define a field for entering the phone number
- input type: checkbox; it is a square that is ticked when we activate it, often used when the user could choose one or more options in the form
- hidden
Required attribute
Almost all the inputs within this part are required to be filled in except those from checkboxes: I order on behalf of company and ship it to different address. How do I make an input to be required? Of course, there is not just one solution for this but I decided to use an attribute required in HTML code at every input that is required. How does such an attribute works? This attribute is a boolean attribute. It requires that the supported input is filled in before submitting the forms. It evaluates whether the input has some value or not. If yes the form is OK to go if no an alert message is shown. Look at the pictures below.
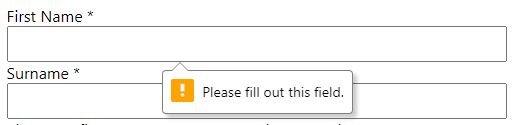
The required attribute works with following types of inputs: text, search, URL, tel, email, password, date pickers, number, checkbox, radio, and file. You can read more here.
The alert message could be also changed for the custom message. We can do so by using method like checkValidity() & setCustomValidity(). This is out of scope of this article so please if you are interested in this topic do your own research.
Input type: tel
I used this input type in 2 inputs: for phone prefix and phone number itself. Let’s stop here for a while. I used different attributes with these inputs so let’s explain them. For the prefix tel input I also used maxlength attribute which helps me to constrain the maximum number of characters within this input. Attribute value helped me to define the default value in this input. The last attribute I chose to use within the prefix tel input is disabled. Thanks to this, users are not able to change the prefix of the phone number as it is disabled and with the default value.
The question could be if it is a good approach. I would say NO! From the perspective of usability and user friendliness we need to take into account that the user could have different phone number from the country prefix that is to set as a default. So the best solution would be to have there a drop-down list with all the possible prefixes from the world so the user can choose from.
For the phone number itself I did not use the maxlength attribute, because I am not sure about the all formats of phone numbers in the Slovakia in order to constrain the number of numbers that could be entered. What I could constrained is which characters to use within this input. I wanted the user enters only the numbers. For this I used regex pattern I found online. In this case we use regex for input validation. This is how it looks like: pattern=”[0-9]+”. According to mdn web docs the pattern attribute is an attribute of the text, tel, email, url, password, and search input types. The pattern attribute, when specified, is a regular expression which the input’s value must match in order for the value to pass constraint validation.
When the entered character does not match the pattern and we are trying to submit the form the following message appears:
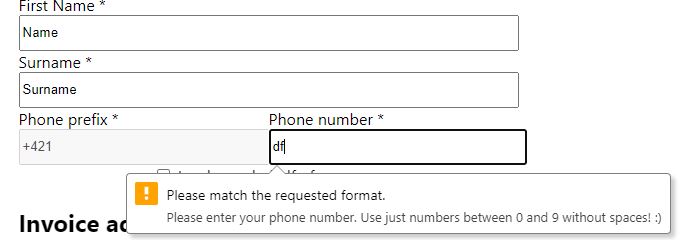
The default message is: Please match the requested format. I added the sentence: Please enter your phone number. Use just numbers between 0 and 9 without spaces! 🙂 This could be done with the help of attribute title where you can enter the desired message and it displays under the main alert message.
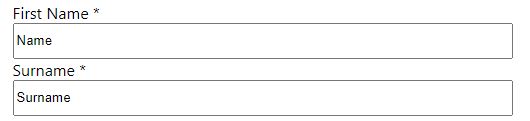
Placeholder attribute
What I find useful is also the placeholder attribute. The placeholder means that there is a text within the input before the user enters any text in the field. We can use this for showing some examples how the entry of the text should looks like.
The <label> tag
I almost forgot about this very important tag within the forms. This tag defines a label for different elements. You can find the list of these elements here. We use <label> tag together with input and also connect them. For attribute at <label> tag and id attribute at <input> must be the same in order to be connected together.
The label tag is helpful for screen reader users, because the label is read out loud, when the user is focused on the label. When using radio or checkbox input it could be hard to click in the small box or circle in order to choose an option. When we add label tag we can also click on the label text and the circle or checkbox will be ticked for us.
What’s next?
I tried to sum up my approach to forms and inputs within this small portfolio project. Sure, I realize there is a way for improvement in some things such as changing the prefix input to a drop-down list and update the alert message with custom messages etc.
I also do have couple of questions before I finish this project that are not solved yet and I am going to find solution to them. I just write them here so I have it somewhere:
- How should the form be coded in order to be submitted to the server? (…and the usage of name tag)
- How to map particular input values with columns in database?
- Which information should be stored in local storage and which not? (take security into account)
All of these questions are kind of starting to feel like learning of back-end is coming!
Thank you for reading this. Hope it helps in some way!
Follow me on socials or write me an email or message on Linkedin
Sorry for any mistakes. If you find any please let me know. You can find my contact info down below.
I am just a beginner. Do not take this as final and the only solution. I am just sharing my learning journey. If there are any advices related to code shoot me an email.
Photo used in this article is from Pecho Crystal